How to Render Large High-Resolution Image in Sections with Redshift (Cinema4D 2025)?
-
Hello!
I am currently trying to render a very large, high-resolution still image with Redshift, but I am running into memory issues that prevent the rendering from completing.
While researching online, I found references to a feature called "Tiled Camera" that allows rendering an image in smaller tiles. However, the information seems outdated, and I cannot find an equivalent feature in the current version (Cinema4D 2025.1 and Redshift 2025.2).
(Reference video: https://www.youtube.com/watch?v=rx1F9xAXI10)Is there a way to render large images in smaller sections with the current versions of Cinema4D and Redshift? Or is there a similar feature available?
Environment
OS: Windows 10
DCC Tool: Cinema4D 2025.1
Renderer: Redshift 2025.2Thanks for your time!
-
Hi shot-alcohol,
Yes, the Tiled Camera was for that exact use. It was pretty much an automatization of a Shift Lens-based sequence.
I have explained the practical camera approach with a Canon TS 24mm.
https://youtu.be/E1UfZbqbE-M?si=dnzFWigSvzPhwL-cThe problems in rendering are often that any post effect is applied based on already rendered pixels, which sometimes makes the "stitching" of rendering difficult or impossible, as the Post effects do not get the "full picture" literally.
So how to do that now?
The field of view needs to be smaller, and taking many "shots" allows them to fill the initially set field of view.
It is all in the Offset parameters. Technically, for a 3x3 matrix, you could use 100% steps (-100%, 0%, and +100%) each time vertically and horizontally to get nine images. I would choose some overlap. You can go farther than 100%, but keep the current camera position/orientation you had planned for the single shot result! Do not change that, otherwise, the result will be different.In the example below, I used 75% of the steps. Move the time slider to see the effect.
CV4_2025_drs_24_RStc_01.c4d
I have added the original camera, to show how it works, move through the frames 0-8.
CV4_2025_drs_24_RStc_02.c4d
As usual, I test before I post, as things change, and answering from memory is not advised.
")
Please test this for your needs, as I have no idea about your setup.
What will not work: Vignetting of the whole, Lens distortion, or any effect not evenly applied across the whole image. Here, I mean per-frame settings. All of those do not stitch very well. Something that doesn't work in the practical stitching world either, just in case you are interested, I have done it innumerable times in the past 20+ years.
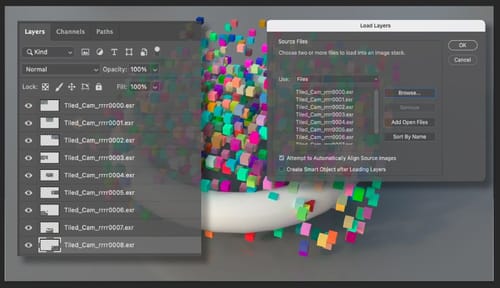
Most lenses fail here, but it is pretty much perfect if the RS camera is used without any post or lens effects.Here is an option to load and stitch them in Photoshop. (Do not use and Spherical based stitching software for that, it will not end well, … typically. It is just an move and match approach, that best works manually with Difference Blend mode, while overlap all black equals match.
I hope that helps.
My best wishes for your project.
-
Hi Dr. Sassi,
Thanks so much for your quick and insightful response! Sorry for the delayed reply, but I really appreciate the time and effort you put into helping me.
I followed your advice, and it worked out quite well. While I did notice some slight issues with lens distortion and color mismatches, the differences are minor enough that I can adjust them using extra space in Photoshop. It seems manageable.
Thanks to your guidance, I was able to set up the rendering with nine sections, and everything is running smoothly now. I really can’t thank you enough for your help.
Also, the sample files you provided were incredibly clear and easy to understand. They saved me a lot of time and made the process much easier to grasp.
Once again, I truly appreciate your support. Thanks for sharing your expertise and making this process much simpler for me!
Cheers,
-
Thank you very much for your kind feedback, shot-alcohol.
I'm glad this worked for you, and you got your result. There is something that I enjoy a lot with high-res images. From your reply, I assume you have a sharp eye for quality.
Please never hesitate to ask; I'm happy to share or look into anything related to visual productions.
My best wishes for your project.