Cloth glitch on procedural mesh
-
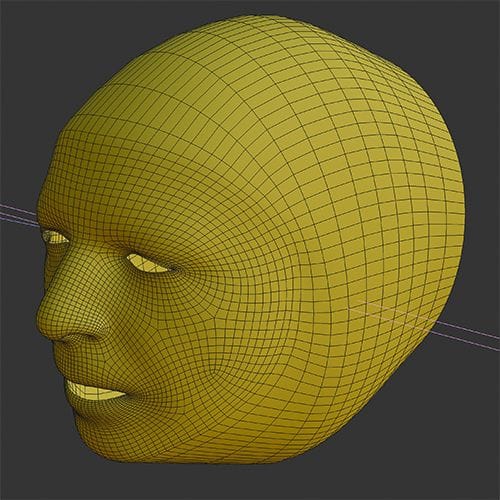
Hi, I am trying to apply cloth to a procedural mesh. The mesh merges a face mesh from "Moves by Maxon" with a Loft. In order to let the loft's edge points have the same position as the face's edge points for a exact weld, I used a edge cloner or the "edge to spline" plugin. The points are welding correctly (a subdivision object or smoothing creates a smooth even mesh).
When applying a cloth tag, the mesh shows constant glitches. It seems like the mesh topology would constantly change. Maybe the procedural edge points causing a problem, although if it's point ID's would change, the loft and and welding would change too (not only the cloth simulation). I tried many approaches (using morph, scene nodes, etc.) Nothing works. Thanks for any suggestions!
I am also trying to attach a sample scene but the website states an error.
[Cloth glitch on procedural mesh 01.zip]error -
sample scene download link: https://www.dropbox.com/scl/fi/n4ek69jut3s95gozt1ro2/Cloth-glitch-on-procedural-mesh-01.zip?rlkey=dadewn8jts9zydrteb4364j3o&dl=0
-
Hi reading-card,
Thanks for updating the file. Zip isn't working by default here, safety/IT-wise. Files in C4D format up to 1MB are direct upload-able.
Dropbox is perfect (so is WeTransfer, Google, Adobe, and Apple cloud services). Please upload uncompressed, if needed again. Thank you.Here is your file back, not considered the final version, but to show the problems. The face border is moving, the Cloner has to prep the result (MG Baking did not improve the results), the Loft Generator builds the Geometry, which is then again built in the Connector, and again In the SDS, while PLA is moving the face, and the Cloth is then to move everything, except for the Vertex map data.
I have gotten to the point of no Mesh-Chaos.
Here is the file:
https://projectfiles.maxon.net/Cineversity_Forum_Support/2026_PROJECTS_DRS/20260102_CV4_2026_drs_26_CAcl_01.c4d.zipThe question is, do you set up a Pose morph for the Face from the Moves by Maxon? Just to get the full picture.
My impression is that I need to find a different approach. Example:
https://projectfiles.maxon.net/Cineversity_Forum_Support/2026_PROJECTS_DRS/20260102_CV4_2026_drs_26_CAcl_11.c4d.zip
I extended the Face as needed first, harvested some expressions, to added them as Target to the PoseMorphs. The point mode in the PoseMorph needs an on and off switch, which erases all point data, but not the morph target animation (sliders), but then it works. The vibrate tag is only there to trigger some motion for Cloth.I will have a look in the morning to it.
All the best
-
Thank you for the prompt reply.
Had a look at your scenes and both bypasses the essential part: procedurally connecting two (deformed/animated) meshes at their edge points who fit seamless together and add additional effects to it like cloth simulations. This approach preserve a valuable flexibility during the creation process and I am wondering if C4D is capable of that. While the points/UVs remain consistent, it seems the "Mesh-Chaos" is caused by hidden inconsistent mesh interpretations. Would be incredible useful to find a solution for that. -
Thank you very much for the reply, reading-card,
The problem with the Connect Object, and too many influences.
There are many forces pulling at the same time. The PLA defines the face, but partially the Cloth is contributing to it, and Welding might not always lead to 100% welding, which means the point amount changes. This is not working for the algorithm.
I searched for another way. I will not list the explorations of the past hours, but share what works.My suggestion
Take the Face with the PLA animation.
Select the edge loop that marks the end of the “mask”. Extrude the edge by just 0.1cm, create an Edge Selection Tag, and extrude it again, and after deselecting the Edge Selection Tag, create a new one. Name both differently. (Perhaps later, some more. For now, I would like to focus on the workflow.)Double-click on the first Edge Selection tag to activate its selection. Shift key down (hold) and click on the Point Selection. Then go to Main Menu Character> Create Cluster.
Repeat this for the second edge (Points, Cluster).In the Cluster Object> Object> Offset, set the offset where the Edge should be in space.
Note that the S.Z in negative flattens the profile, while S.X and S.Y in positive scales it.
Create now from the original Points of the face mask a Vertex Weight Tag, name it wisely, this is for the Cloth.
Set up Cloth (to the Polygon object Face Mask), as you need it, and use the Vertex map as before, in the Mix Animation Tab.
Apply the Subdivision Surface on top if you like.
The setup is smaller, in my opinion, easier to handle, and can be adjusted with the Cluster parameter.
Example
https://projectfiles.maxon.net/Cineversity_Forum_Support/2026_PROJECTS_DRS/20260102_CV4_2026_drs_26_CAec_01-02.zip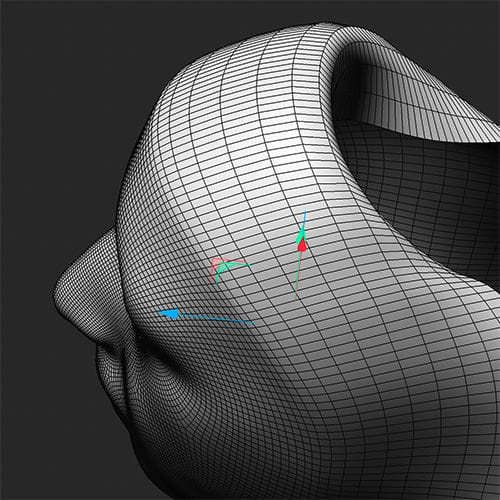
One point, set the Attribute>Scene> Simulation> Scale to the size the object has. 100cm is too larger for this.
Please let me know if that works for your project
Cheers
-
Thank you for your suggestion. I am looking for a none destructive, procedural solution as the face and the loft will change in future. In the original scene, the actual Moves by Maxon face mesh is used and will be replaced with further face captures. I just baked it to simply the scene. Also, the design of the loft extrusion needs to remain procedural during the creative process to test the behavior of different loft shapes along with the cloth simulating. Thus, the procedural welding is crucial.
I have tested the welding intensively by adding a Smooth Deformer and Subdivision Surface to the procedurally welded mesh. If points would not be welded or wrongly welded, it would cause already visible glitches, holes or or hard edges. So it seems the problem is somewhere else...
-
Hi reading-card,
If the Connect is not in use, the weird jumping of the geometry stops.
The point numbers change constantly, and since the points are exactly on top of each other, which one is used is “survives the weld is random. The only way to make the points stable is to move the part that should have a stable polygon number a little bit, in this case, to negative Z, while also being the lower child of the Connect. However, that requires increasing the weld tolerance. Which in return has a lot of new weldong of points, and the change here is not wanted, of course.
A simple example of the changing Point ID numbers:
https://projectfiles.maxon.net/Cineversity_Forum_Support/2026_Clips_DRS/20260103_Connect_changes.mp4
Hence why I searched for something that works without Connect.Perhaps check with tech support to get a second opinion.
https://www.maxon.net/en/support-centerHere is an idea to make the faces exchangeable in a short time. Just exchange it in the XPresso editor.
The idea is based on taking two loops from the "frame of the mask and using the B-Spline setting in the Splines.
To get the first loop of the face as data, it needs to be transparent.
With these two points per spline, a certain softness is given, but a small indicator for an edge remains.I have typed in all values manually, as the mesh has no sequence ID numbers for the points.
While edges run in both directions and randomly
Also, here, the Connect changes the geometry along the animation.Example (exploration)
https://projectfiles.maxon.net/Cineversity_Forum_Support/2026_PROJECTS_DRS/20260103_CV4_2026_drs_26_CAfe_01.c4d.zip

The next exploration is an XPresso that takes the out Edge Point Numbers into a Condition again, to “normalize the point access numbers. Given that the face is a standard, the work to type them all in was worth it; however, that should be a feature request for the Selection-Iteration.
With a Polygon shape from a given Loft (N-Side with 56 “corners”) and using the “Current State to Object” to get it, the connection was done with an iteration of the Condition and the Face Mask.Here is the example, and the face can be swapped out. Note that the Damping the in the Scene> Simulation>Simulation>Dampening is set to 25%.
https://projectfiles.maxon.net/Cineversity_Forum_Support/2026_PROJECTS_DRS/20260103_CV4_2026_drs_26_CAfe_21.c4d.zip
The key idea would be to define a workflow that stores the PLA animation and applies it to the model as is. Meaning creating a model as needed, and applying the Morph Shapes to it. Then the PoseMorph would run it.Good luck with the Project.
-
Thanks for the examples. I've informed the tech support as you suggested. Let's see if they have a solution.
When looking at the point IDs, there are sometimes two IDs overlapping each or IDs appear where there are no points. When baking the mesh with this wrong IDs, it seems all welded fine. It looks like a bug that screws up the underlying topology and although it's not visible at the first glance, it confuses the cloth sim. -
Hi reading-card,
You're very welcome. It is a valuable discussion, as it touches many points. Hence why I go a little bit deeper.
If in doubt, it is always good to get a second opinion. Thanks for contacting Tech Support.
The Connect object can weld points as long as they are within the tolerance distance.
The distance must be smaller than any point-to-point distance of each object itself; otherwise, one would destroy the work, like the face mask. Here is the main problem, as the animations might pull points out of that range.Now the face mask has some motion, and the Cloth adds to that.
In the moment a single weld “pair” is no longer a single point, the ID of each following point will change, since we have two objects in this mix here, the IDs are sorted one after the other.
In the 10-second clip I made for you, this is demonstrated, first the move, then which object is closer to the Connect object in the Object Manager.
https://projectfiles.maxon.net/Cineversity_Forum_Support/2026_Clips_DRS/20260106_Connect_New_Points.mp4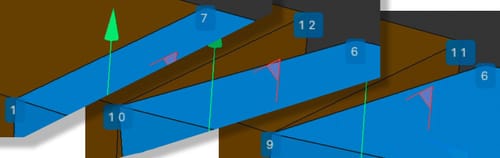
I am typically careful with calling something a bug. Not to be biased here. But settling for a bug means stopping to understand what happens, hence the video.
As I mentioned above, there is a lot going on, and PLA and Cloth are both point-related. If anything is placed to them before the Connect is working, that is not a problem, but if the Cloth calculates points, and the ID is changing, then there is confusion about what is going on. Since animation changes over time, the change needs stability, meaning stable IDs over time. Motion Blur, for example, later on in the mix, and essential for any professional production, can’t know when an ID vanishes and then frames later pop in. Just one pair of points welded or not defines a lot of other point IDs to change.
There are just limits, and not everything that can be combined and results in stable situations.
All the best
-
Your example used rectangular shapes. The example I sent don't have rectangular edges. If you like to disprove, please use the same data. I know that the connect function only works in a certain range. Even considering C4D's frame delay difficulties, the mesh I sent is always connected. Add a smooth modifier and it will be always smooth. Any brakes in the mesh would lead to glitches in the smoothing (or just phong). So this is an welding bug that appears when using cloth (or maybe other features). Even Scene Nodes Like "Extrude" do not work correctly. The last reliable function was using "Py-ParametricTools". I guess that was back in 2016.
-
Btw, C4D support confirmed it as bug.
-
Hi reading-card,
Sorry when you get the idea of an argument here. Not my intention. The example was to show case that the numbers changing, while using a simplified model.
Please continue to explore this with tech support. I saw the ticket and you are in excellent hands over there.
Take care.