Wrapping spline around object
-
By the way, this was the video that was originally shared on Cineversity (thank you Sassi!)
https://www.dropbox.com/scl/fi/qmf7uskrhs62muw2thhru/Rubberbands.mp4?rlkey=6yria9353a0pu2ii7rqzsw82r&dl=0This is roughly the effect I want, except that in the end I will want it to look as if a single seatbelt was wrapped around the whole frame, but I can cheat that with a series of loops
-
Thank you, AlexC, for the file.
Projecting is based on the "vertices/points only, which indicates the first tip, more points. Here are editable points, not just internmediadiate points. (Curent State to object, to convert intermediate points to editable points.
The Projection method used here is Spherical, which means points are moved to the axis until they hit a surface, leading to results that might not look logical, given anything wrapped around the two frame sides. To stop the points being only projected to the "tubes of the frame, I have introduced a little cube to stop the projection. The cube is no longer needed, except if you like to project a Rail spline, as used in the video, then the cube can go.
Anything else is as in the video clip.
Let me know how that works for you.
Here is the file back:
https://stcineversityprod02.blob.core.windows.net/$web/Cineversity_Forum_Support/2024_PROJECTS_DRS/20241113_CV4_2025_drs_24_MOsp_21.c4d.zipCheers
-
Hello Sassi
Thank you for this. Unfortunately it doesn't quite work because what I am trying to achieve is for the wrapping to happen around each "segment" of the tube.
See this screenshot : https://www.dropbox.com/scl/fi/ay8vsrysa244dr7qryedu/Cinema_4D_UDhSaM05yE.png?rlkey=fn10sca2oktmnnccumtfh3g9y&dl=0What would be a good way to achieve this? Should I "hide" certain polygon selections? Or do I need to cut the frame up into smaller pieces?
Thanks!
-
Hi Alex,
Please have a look at the file below
https://stcineversityprod02.blob.core.windows.net/$web/Cineversity_Forum_Support/2024_PROJECTS_DRS/20241114_CV4_2025_drs_24_MOsp_31.c4d.zip
The Yellow Layer objects are a circle spline that runs around the path I have drawn so I can place the circle easily.
When you project this, some points stray away to other parts of the object, not the closest. This is the problem, correct?
To overcome this, I have tried to find the simplest way, like setting up a Boole to cut the area temporarily.
However, I believe the PolyFX is the faster way, as it allows a Field (or several Fields) to define the area that causes problems and scale them down to zero for the time being.
As an alternative, I have checked out other options than the one we had back then.
ProjectShrink Wrap and Thicken is a powerful combination here. No idea if that helps your current project, but I thought it was worth sharing.Cheers
-
Hello Sassi
This is great, the PolyFX trick works really well.
But I think the Shrink Wrap is actually even more flexible, even if it becomes harder to create procedural setups where they would overlap?
When you say combining Project and Thicken, do you mean Shrink Wrap and Thicken?Thanks again!
-
Thanks for the reply, AlexC.,
Yes, Shrink Wrap was the idea, not "Project".
The layering of these elements requires that a single object is referenced; perhaps an option is to create all first layers to the objects, then create via Volume Builder/Mesher and Remesh a new single object for the Shrinkwrap for the overall second layer.
I have no idea how to do this faster. Perhaps try to explore the Connect object (weld off) as a master parent for all existing parts. However, getting "dummies" from the Volume/Remesh workflow is more stable. Add the layers to each (here only the Sweep_Left.1" is shown, but to combine all, for the next step, it needs to be one object.
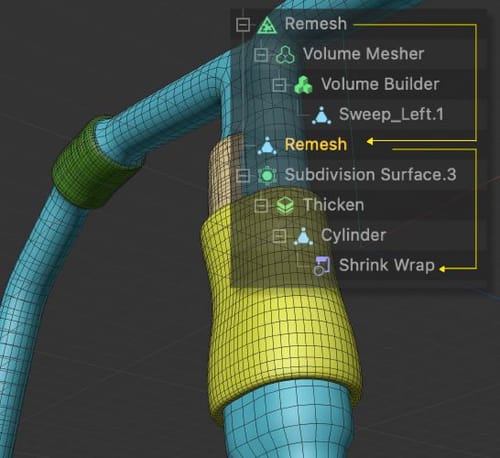
(Pale blue = "temp-dummy")
My best wishes for your project
-
Hello Sassi!
I'm coming back to this topic because I realized I needed to approach it slightly differently, but I'm getting stuck. I tried using your shrinkwrap approach, which is really great, but somehow it doesn't seem to work on this geometry.
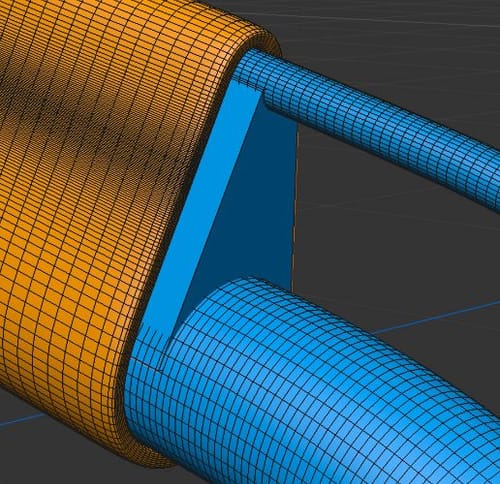
I have two "rods", and I want the cylinder to "wrap" them both as if it was in tension between the two rods.
What I am getting is a strong "pinching" between the outer rod (thin one) and the inner rod (wide one). Do you see what I mean? I would like it to look as if the piece of "fabric" was in tension between the outside and the inside "frames"...
https://www.dropbox.com/scl/fi/kcx6ctxwmv9d5xcw20gl3/DrapingTechnique.c4d?rlkey=tii3vudm2mti5dvxa3tut6fg4&dl=0Thanks for any suggestions!
-
Hi AlexC.,
Thanks for the files.
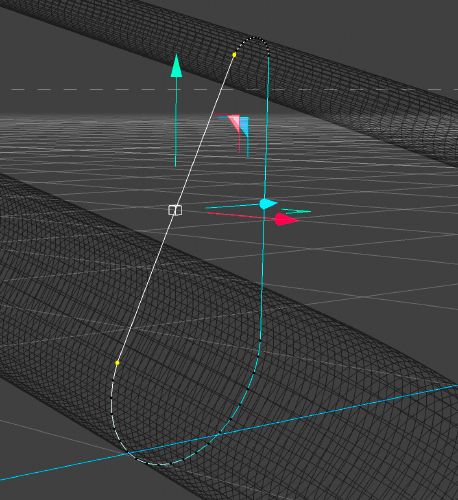
Take a new Cylinder, make it small, then move it up and tilt it so it nearly touches the bigger tube, so the smaller one has more segments.
To avoid the part between the two tubes, as shown in the example shared, you must place a support object between them. (…_11.c4d)
The other option is to select the edges and connect the top and lower parts of the selections (file …_01.c4d). The tools needed for that are all in the Spline Menu. Setting the first point, connecting Splines. More of these Spline profiles must be created if the tube is bent.
Here are both files:
https://projectfiles.maxon.net/Cineversity_Forum_Support/2024_PROJECTS_DRS/20241218_CV4_2025_drs_24_MOrs_01-11c4d.zipCheers
-
Thank you Sassi, those are both great solutions! Thanks again so much!
-
Thanks for the feedback, AlexC.,
You're very welcome.
Happy Holidays!