Particles looks different when rendered at high resolution
-
Hi Dr Sassi and all,
I'm having an issue with the particle system that I need advice on please.
I have custom objects within the RS tag that make the glitter. When rendered at lower res it has a different look to the high res where the particle look a lot smaller and the streak effects look different too which is not what I want
Is there something I'm missing?

-
Hi high-spite,
Without knowing the project settings,
Here is my short demo:
The resolution you provided shows a 1:10 ratio, which means for a 2D object that is a hundred times more pixels in the hi-res than in the low-res. (I rounded your 1460 to 1500 for clarity.)
The energy (light) that a single pixel has in the high-res version, if no post effects are applied, can't grow over one pixel. It creates one pixel.
The energy (light) that a single pixel has in the low-res version, if no post effects are applied, can't grow over one pixel. It creates one pixel.However, in the low-res version, that pixel has an area that is a hundred times larger. It will show different if both images are shown side by side in the same size.
This is the short explanation. Anything else, I need the file, reduced to the problem.
If it is larger than 1MB, then it can't be attached here as a C4D.
Please use a cloud service, but for security reasons, I will touch only Wetransfer, Google, Dropbox, Apple, or Adobe. Please paste the full URL into the text, no HTML wrapper. The file uploaded as c4d, no compression, no zip, and surely no rar. Sorry for the long request.
All the best
-
This post is deleted! -
Hi Dr Sassi, I think I know what you are explaining. Is the way to counter this to simply make the particle size bigger or any other method?
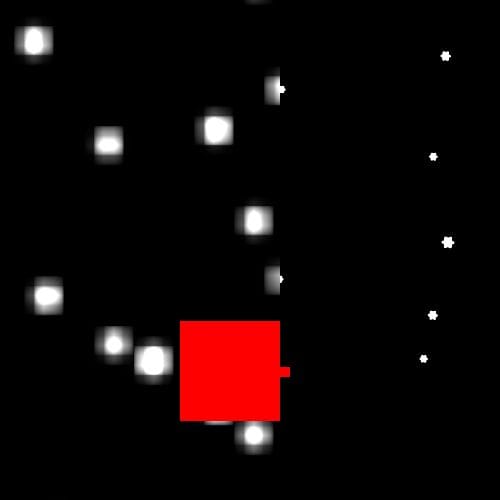
I've uploaded the file to dropbox along with a render at 1500px and one at 9000px for reference.
https://www.dropbox.com/scl/fo/3sdf80lo0c7al2lh27bgc/AKAGuVTsgQwtf5pNEEvjB3Y?rlkey=vpbweac86hqxx38hnjdn5aoj3&st=cif4crdn&dl=0
-
Hi high-spite,
Thanks for the file.
There is no comparison to an image that has 36 times more pixels to define the result.
You might explore the Filter and Filter Size.
https://help.maxon.net/c4d/2025/en-us/Default.htm#html/VPRSRENDERER-REDSHIFT_RENDERER_TAB_SAMPLING.html#REDSHIFT_RENDERER_UNIFIED_FILTER_SIZE
Explore which filter provides you with a better result.
Explore oversampling. Meaning using 9K and going down to 1.5K as defined below:
To do that in one step often harms the outcome.
If you need a single image only, render in 9K and then set the Image resolution in Photoshop twice: first to 4500, then to 1500 (Photoshop> Image Size> Resample Preserve Details 2.0). You may also use three or four steps to scale it down.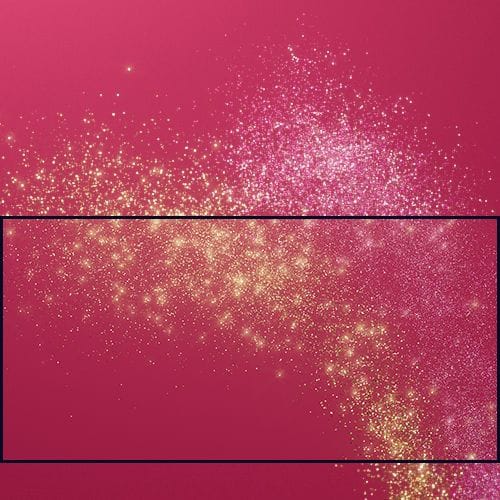
In the black frame the downsampled image from the download, as described above.Another point is the limitation of 8-bit/channel, which doesn't allow good downsampling, as the energy that you might have is gone. Some of your particles have values way above 100% or 1.0. This energy is visually absorbed (based on less contrast) to a certain degree with Bloom and Strike.
You have Bloom and Streak enabled as post effects, both baked into the render and applied as 8-bit/channel only, which will surely contribute to the problem.
Consider adding that later, not on the render directly (baked in), and use 32-bit/channel float (OpenEXR, Tiff, or PSD can handle this.) Later go to any format you need. During production I suggest avoiding 8bit/channel strictly.
Let me know if that works for you.
Cheers
-
Hi high-spite,
Last night (I'm on Pacific Time, and it was way past midnight), I made a note to explore this deeper today.
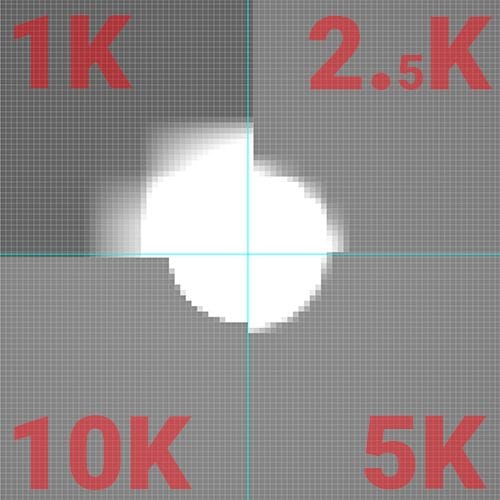
Here is a project file with a variety of resolutions. Please render each out, while activating the little square in the Render Settings Names.
The intensity of the dots on the right is set to 1.0, and the one on the right is set to 5.0. Rendering is set to 32-bit/channel Open EXR to preserve this energy.
Next, load it into Photoshop by going to File> Script > Load files into Stack.
Scale each layer to fit the 10 K frame. 200%, 400% and 1000% for the CMD+T transform.The layer names should tell you which one is which.
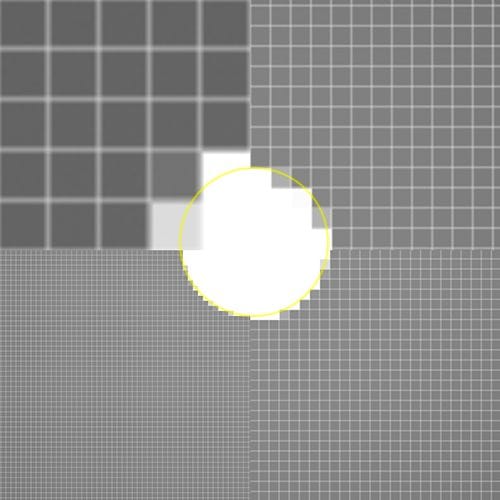
The key takeaway is that the smallest "disc" is limited to sharing its energy as much as in the high-res images. My impression is that most of it is gone based on sampling (call it AA) to the neighbor pixels. With this, the Post effects have trouble getting the same information, while the stronger "bleeding in the (low-res) larger pixels compared to the particle (disc) object creates the effect that the particle is larger. While the match of particle and pixel is not predictable, simply adjusting size and Illumination weight might not yield the desired results.
In the image, you can see that effect for the 1K, occupying the neighbor pixels the most (the grid of pixels is the 10K base, and the images are scaled to match), the Bloom is lower for the 1K!) The dot is from the 0.5 cm disc with the 5.0 weight of the emission. When you look closer, the "pixel-blocks" show up in each, the largest in the 1K.
To get good results, Oversample (perhaps twice what you need), then scale down.
All the best
-
Thanks Dr Sassi for the detailed explanation. Really is an eye opener on some things I never even thought about. I'll have a play and see what I can come up with.
Most appreciated
-
Hi high-spite,
Thanks for the feedback. Like with textures, where the suggestion is to have, at least, 1.5 times the resolution, to not noticeably lower the quality if the render (the 1.5 here means if the camera comes close, that this ratio is given, as it is nearly impossible with shaped objects to match each pixel from texture to render. Similar to that is the size of an object, since we have a very small one, typically with Particles. Here, the particle has a shape, which needs to "translated into the final pixel raster.
Like with any pixel movement that deviates from the next pixel position, changes that are longer or shorter will lower the quality. Lens distortion correction is a type of movement that affects quality.
The post effects can only "see" the scene through the rendering (the raster of the resolution), without any knowledge of the actual scene.
The Nyquist Frequency is a good way to explain it. Living in a cave and emerging only every 24 hours will give the impression that it is always night (or day, etc.).
Another point is that objects, especially particles, move, plus the camera might add screen movement for them as well. So they move through that raster of the final image. A typical example is Analog audio sampled into digital, which can lead to many problems if the resolution is not high enough.
But I get carried away here. I think the idea is clear, and I apologize for going on about it, but perhaps a few readers might find this supportive to know.
Cheers
-
Referenced by
 Dr. Sassi