Splines to create a trail but with geometry.
-
Hi Dr. Sassi, in times of need I come to you for knowledge.
At my company we’ve been trying, without success, to create a path using 11 rectangles.
As you can see in the Cinema file I attached, the rectangles move forward, and with the bend you get something like a bird-flying effect.
What we want to achieve is for each square to generate geometry, like an extrusion. As the splines move forward, the geometry should appear behind them.We tried creating a Connect object, placing the group inside it, and then extruding everything, but that made us lose the trail effect of the wings.
Here’s a real-life example:
I am using Cinema 4D 2024.4.0
Thank you so so much! I hope you could find the solution ( I know you will") )
) -
Hi Dorna Sports,
Thanks for the files.
Nicely prepared!Here is the project file back. (Tested as well in 2024.5.1)
CV4_2026_drs_25_MGmw_01.c4d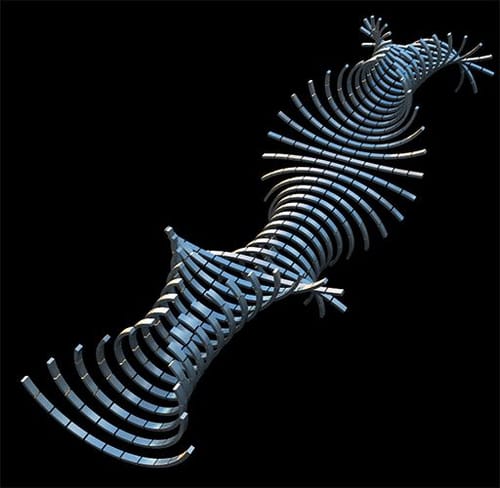
Please note that I had to set up the F-Curve for the Deformer in a different way, allowing for a full effect to be covered over time.
(F-Curve> Function> Before/After)The key to the change is located in the
Step Effector > Parameter > Other > Time Offset.
The change will change the frequency of the wings.I have deleted the forward movement in the Group setup and used the Transform of the Cloner instead. If the Step manages the position changes and the Bend, it starts with the first to move forward, then the next, until all move forward. With the transform, all of the elements move in sync.
Please let me know if you have any questions or if you need any changes.
Enjoy the project!
Dr. Sassi Sassmannshausen Ph.D.
Cinema 4D mentor since 2004
Member of VES, DCS. -
@Dr-Sassi Thank you for your amazingly fast reply to my post. Since English is not my first language, I couldn’t explain exactly what we needed.
Right now we only have pieces, but my idea is to create 11 single strokesThe idea is something like the image.
That's why I tried to animate the shapes, to see if I could extrude something and make the recently extruded parts remain static
-
Hi Dorma Sport,
Let's try this, and don't worry if it is not along your idea as well; at least it will help define the target more clearly.
Example:
CV4_2026_drs_25_MGmw_02.c4dAll the best
Dr. Sassi Sassmannshausen Ph.D.
Cinema 4D mentor since 2004
Member of VES, DCS. -
@Dr-Sassi I think this C4D file explains much better what I wanted to create than my limited English.
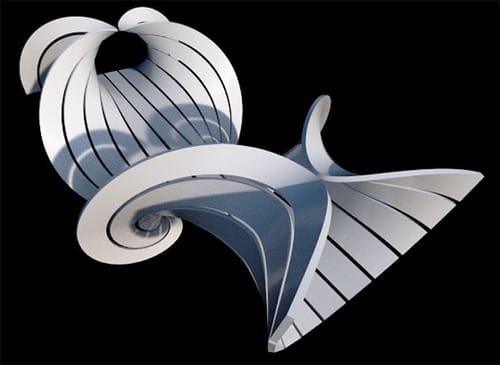
Here’s another image to illustrate my explanation.
On the right is as far as I got; on the left you can see exactly why I want to extrude.
The difference lies in the orientation of the squares: on the right the squares always face the Y axis, while on the left the squares rotate naturally — and I need that natural rotation.Is this possible in Cinema 4D? It looks so simple, but my team and I can’t find the solution.
You are our only hope, Dr. Sassi and thank you for our time!
-
Hi Xavier Solans,
Here are the two that will not fit, but I wanted to show you that I explored them further. Then, you shared a new image, which made me hopeful about creating what you need. (I saw the example image as a multi exposure shot, merged, hence I missed your idea)
Exploration three and four (Not your target, I got that)
CV4_2026_drs_25_MGmw_03.c4d
CV4_2026_drs_25_MGmw_04.c4d
Now I understand the Extrude; not just the Spline extrude to give it a static shape, but also to draw a line.Example:
CV4_2026_drs_25_MGmw_05.c4dThe Tracer is set "from end" with a length of 24 frames; more frames result in a longer tail, while fewer frames result in a shorter one.
Let me know if that works.Cheers
Dr. Sassi Sassmannshausen Ph.D.
Cinema 4D mentor since 2004
Member of VES, DCS. -
@Dr-Sassi , let me tell you something... I have NO IDEA how you did it, but this is the best possible outcome for me, haha. I'm trying to decipher this document and it feels like dark magic, but tomorrow morning (it's 1 AM here in Barcelona) I’ll go through it carefully to understand it, because this is GOLD!!
My team and I will be forever grateful for your time. Thank you SO MUCH for sharing your knowledge and investing your time in this forum.
Cheers from Barcelona
-
Hi Xavier Solans,
Now that the concept is clear, I checked the solution that I have send before, and it needs some adjustments to keep the front caps oriented. Not a major issue, but it requires additional effort.
In short, the "Matrix.Motor" is the one receiving the Bend Deformer Information, but it needs the next "Matrix.Main" to combine that bend information with the Matrix.
The "Matrix.Rail" is additional information required to run the Sweep object.
To get the information into the Sweep object, the Tracer is used.Here is the slightly adjusted version.
CV4_2026_drs_25_MGmw_06.c4dHowever, I was not completely happy with the adjustment …
Here is the version that a thing should be easy to work with and does not need to be adjusted to keep the front caps "straight".
Main steps:
Again, the "Matrix.Motor" receives the Bend Deformer treatment, which needs that extra Matrix to merge the bend.
Then, the "Matrix.Main" can be fed into the Inheritance Effector to share the data. Here, the Effector> Morph Motion Object option is checked.
Now we need a Main Spline and a Rail Spline for the Sweep.
This is done with two identical settings. The information (Clone) for the Tracer is simply a Main Menu > Create > Polygon > Empty Polygon.
With the Main Menu> Window> Structure Manager> (Point Mode). Add one line to it and set the point to 50cm in X, for the other Polygon "-50cm" in X.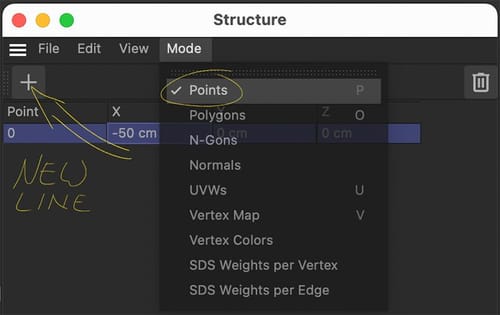
This single point in each setup is now moved based on the setup under 1.
With the help of each "Tracer.Main" and "Tracer.Rail", a Spline is created to feed the Sweep, while the profile is just a Spline-Line object. The Rail Scale of the Sweep determines the size (hence the Polygon 50cm or -50cm defines the size here).This creates just a thin band, which receives its Thickness from the Thick Object.
Cheers from California!
Dr. Sassi Sassmannshausen Ph.D.
Cinema 4D mentor since 2004
Member of VES, DCS. -
@Dr-Sassi, Dear God of Knowledge, thank you again for these files. Version 06 was already perfect, but with Version 11 I had to update to Cinema 4D 2026; otherwise, I could only see the splines and not the geometry.
As soon as I fully understand the wizardry you used in Version 06, I’ll move on to Version 11.
Today is a holiday in Barcelona, but let’s be realistic—understanding this is far more exciting, hahahaha.
Once again, thank you so much for your time and for your explanations in this post.
-
Hi Xavier Solans,
Thank you very much for the kind feedback.
The reason for the problem with the earlier version, the Line-Spline Object. Sorry about that.
It can be easily replaced with zero disadvantage, I tested the geometry animation in 2023, 2024, 2025, and 2026:
CV4_2023_drs_25_MGmw_11.c4dPlease let me know if you have any questions!
Enjoy La Mercè!
