Preparing Materials for glTF
-
Hi David,
Please know that we are all learning every day. In fact, I try to learn a new app every month (or at least a significant update) just to keep the experience of being new to an app fresh. (I have done this for over thirty years by now.)
I surely know how it feels to know that there is much to explore. This is a good perception, as thinking to "know it all" leads to an immediate stop to learning. I'm happy that you share where you are at the moment, it makes it so much more fun to answer.Think of anything not image-based as (most likely) application-specific, like parameters and Shaders (algorithms to produce visual results on surfaces or for renderings). With the number of 3D application-based surfacing methods, glTF would be overwhelmed and forced to read them all. To keep it fast, things need to be prepared, and then one can enjoy the ease of use of glTF.
Your conclusions are spot on, and the main work is done with images. Anything based on procedural texture production (Shaders) needs to be baked, which results from knowing the position of the surface (UVs) and what the specific point is producing while mapping it to an image-based file. Baking, in other words, takes the workload out for the glTF and allows a much faster and kind of universal way to showcase objects from many sources.
The best way to learn 3D quickly is to observe your environment whenever time allows and ask yourself (or others) how that is reproducible in 3D. This will free up a lot of time for learning whenever nothing else is to do, like waiting for a plane or train.
Enjoy
-
Thanks Dr Sassi,
I think I understand now, so basically I need to turn all the materials into raster images that then wrap around the model, and this process is known as baking yes? So I need to turn my attention to baking and understand how that works thanks again
Kind Regards
David -
Hi David,
Yes, you are on the right path. Baking is the key here, and shaders, which rely on the proper UVs of the model, are used.
However, the best idea would be to start projects that need to be exported to glTF using textures-based work. That sounds logical, but since I write in a forum with a wide variety of experience with this part of the production, I hope it is OK to mention it.
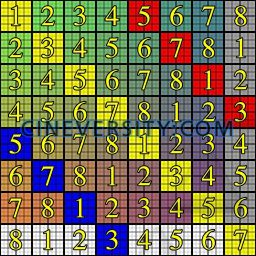
That said, it is good practice to explore the texture space with a checkerboard texture to see how evenly it is.
Below is a mini example (small for demo purposes only. The more equal the squares appear on the model, the more efficient the texture is used.

All the best
-
Hi Dr Sassi,
Thanks again for the advice. Just so I'm using the correct terminology, when we say 'Texture', is this a material that is based purely on a raster image as it's source? and a 'Shader' is a material generated from within Cinema? I think I've heard the term 'Procedural' for these too, is this correct?
So in order to fully understand the baking process, I now need to turn my attention to learning more about UV's and exporting a UV map to paint on? Am I correct in assuming this? Thanks.Kind Regards
David -
Yes, David, all your assumptions are correct.
The idea of UV, or more precisely UVW or UV(W), is simple: finding a "translator" from a 3D object/surface to a 2D texture/image.
To make that happen, each polygon of an object has a "twin" in the UV "mesh." Yes, Texture is an Image, and Shader is a Procedural, algorithmic formula, etc. Shaders can work as 2D or even 3D sources for objects. Shaders are usually resolution-independent, meaning they will not show "Pixels." Textures might show pixelation if the camera-object relation revealed that the resolution was not sufficient.
XYZ was taken, so UVW is used. The W is for 3D shaders, like noise, when it works in 3D. For 2D – UV is all we need.
Sounds complicated; yes, it can be if introduced wrongly.
Please have a look here:
https://stcineversityprod02.blob.core.windows.net/$web/Cineversity_Forum_Support/2024_Clips_DRS/20240601_CV4_2024_drs_24_TXuv_01.zip
This is a drill I have developed, and over a long time, this has worked wonders with anyone in my Hands-On Classes for quite a while now., as it convinces the brain that there is a connection between 2D and 3D.
So, every five years or so, I have to update it, which I did this morning to bring the interface up to date.
Please do it, perhaps once daily over the next few days. You will see that any UV training you take after that will work much smoother.
The core idea for baking preparation is that UV polygons do not overlap, as they might need to provide different information in each, but pixels can't do more than one set of RGB (baking does not work in layers when overlapping UVs are given!).
Enjoy.
-
Hi Dr Sassi,
Thanks for the advice. I've watched the video through a few times to try and understand what's going on. If I'm understanding this correctly, the texture image doesn't fit on the plane as desired due to the squares being distorted. The points being moved in the left hand pane are being used as a reference to re-map the image to fit properly into the four square polygons of the plane. Am I understanding that correctly?
Kind Regards
David -
This is correct, DaveMDarcy!
I love your precise way of learning and communicating.
The main idea here is that this drill creates the connection (between hand-eye and brain)—hence, it needs to be manually done. This provides the interaction needed to put the seed into place.
The target of UV and a proper setup is that we get an equal distribution over the whole project, even when the polygons vary in size.
On the other hand, you can also provide more pixels for the area of interest, while parts hardly in the render might need a little less. Of course, if that kind of optimization is needed.
I'm sure you will feel familiar very fast. Many great tutorials are available; let me know what you would like to learn next.
All the best
-
Hi Dr Sassi,
Thanks again for the advice, and the feedback
 I assume the next step then is to learn how to export a UV map so that I can paint a texture for my model and apply it, and then learn how to bake the procedural based shaders (that I've already made on my existing models) in order to use them in the same way as textures?
Kind Regards
David -
Hi David,
Have you explored Paint, or as it was called, BodyPaint 3D?
It is like Photoshop, but painting on objects. Or do you already have an application that you are more familiar with, like Procreate (iPad), which allows you to paint on models as long as UV data is sound?
Please let me know.
Cheers
-
Hi Dr Sassi,
No I haven't got into Paint yet. I'm still only on the very basics of Cinema so I've not ventured very far from the basics
 I'm very familiar with Photoshop though, I've been using that for many years. I haven't heard of Procreate.
Kind Regards
David -
Hi David,
Typically, the reply is, "I'm more familiar with Photoshop," and learning Paint in Cinema 4D feels a little bit uncomfortable the first hour, especially when one is very comfortable in Photoshop.
Adobe has less and less attention to 3D in Photoshop, hence my suggestion. (Procreate is not a Maxon App, but very popular on iPad.)Well it is late here (WestCoast) but I can't help it, here is a one minute screen capture for Paint. It is more profound, but just to give you an idea.
https://stcineversityprod02.blob.core.windows.net/$web/Cineversity_Forum_Support/2024_Clips_DRS/20240605_Mini_Intro_Paint.mp4
Check the material manager. Sometimes, a material has a red x, which means it is not loaded. To save RAM, click on the red x, and it loads.
Enjoy
-
Hi Dr Sassi,
Is that the West Coast USA? I'm in UK where it is morning now. I thank you very much for your time.
 The only reason I mentioned Photoshop is because I'm hoping it will help the leap to Paint not as difficult
  I've just found in Cineversity a three part tutorial series called 'UV Workflows', that look like a good course. Also thanks for the link to the video, I shall watch that now.
Kind Regards
David -
Hi David, yes, California, and I called it a day after recording the clip for you, hence the delayed reply.
Yes, Photoshop knowledge is helpful, except for the muscle memory
 The interface and workflow are different, but the idea of Brushes and Layers, which I think is an essential part of Ps (user since 1993 here), is there. Well, there is one "Ps" layer package for any layer of the old material system.
The advantage is, that you work on the model directly and get better feedback. (Standard Render).
All the best
-
Ooh nice, I'd love to visit California, hopefully one day I will
 I did part one of the UV workflow series today with Mr Noseman. There was loads of great info there, I learnt loads. However it also revealed just how deep a subject UV's are! I will continue to practice your drill until I can remember it by heart
Kind Regards
David -
Hi David,
You are in good hands with Noseman.
Please remember that UVs are one of the most avoided themes, but if you walk through this material, you will feel empowered. Fingers crossed, you will enjoy that feeling very soon!
Cheers