Help! Fix Texture problems on a cloner.
-
Cannot get the texture to end up in the right place when I render. Looks OK in the IPR but goes all wonky for the render.
The attached images are correct from IPR.
Collected files here: https://www.dropbox.com/scl/fo/t9p8sr37iqih6mugzb6rk/ADAFZUuobvaq10yWtUoN76o?rlkey=jkwvedl2c3zzu8hg2ciohc8rc&st=puup2hmy&dl=0 
-
https://www.dropbox.com/scl/fo/t9p8sr37iqih6mugzb6rk/ADAFZUuobvaq10yWtUoN76o?rlkey=jkwvedl2c3zzu8hg2ciohc8rc&st=au7an1hl&dl=0
-
Hi department-task,
Please have a look at the file below. Please place it in your project folder so the textures match.
https://projectfiles.maxon.net/Cineversity_Forum_Support/2024_PROJECTS_DRS/20241212_CV4_2025_drs_24_MGuv_01.c4d.zip
Is this working for you?
The Cloner increases the number of Clones, and I see the problem here. The fixed UV per Cloner Child will be a stable solution for this setup.
All the best
-
Sorry Dr. Sassi , I tried to copy-paste that and the link didn't work:
https://projectfiles.maxon.net/Cineversity_Forum_Support/Cineversity_Forum_Support/2024_PROJECTS_DRS/20241212_CV4_2025_drs_24_MGuv_01.c4d.zip
[And TY so much for such a fast reply! 1 Do you ever sleep?!]
-
Hi department-task,
Please try again. I had twice the part of the path in it. My mistake!
I stopped last night at 12:30 (Pacific Time Zone) and got some sleep; thanks for asking. I dream about hibernation.
Please let me know how it goes. Thanks for your patience.
Cheers
-
That worked a treat. When you have a moment can you let me know how you split it into component parts? I'm off to bed so no rush!
-
Hi department-task,
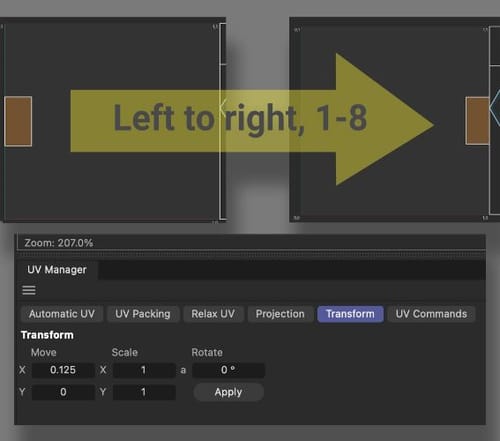
I selected the single polygon that carries the "text" from the "BET_MASTER_LOGO copy.png".
Since it was split into eight objects, I used the needed UV Polygon, selected it, and used the (UVEdit layout) UV Commands> Fit UV to Canvas.
Then I went to the Transform tab and reduced it, scaled to 0.25 in Y and 0.125 in X. Then I moved it to the left, Moving -0.0625 for x, then -0.125 (One can do that in one move, but that works faster for me) for x several times until aligning up left.
I made a copy of that object (MASTER_OCTOGON.0), and now, with the UV selected for that new object (MASTER_OCTOGON.1), I moved it +0.125 in X.
Next copy (Cmd drag in the Object manager), next move, repeat: Until MASTER_OCTOGON.8 was created.
All eight were placed under the Cloner, applied the materials, and done.
I renamed them later and might have gotten the number reversed, but that is just a label; the sequence is important. See the project file.
The alternative would be to do this with the Material tag's Coordinates. I love UVs, and I no longer have to care about the material tag settings. But well, that is case-dependent.
I hope my few lines make sense.
Enjoy
-
OK, I'll give this a go! Thanks SO much again! Best, Brian
-
Thanks for the reply, department task,
Let me know if you have any questions; I'm happy to look into it.
All the best