Body Paint Seams
-
I know Cinema4D-21 is no longer supported but I'm hoping someone will know if the issue is a limitation or some kind of setting issue.
In Body Paint (R21) where an object is already UV mapped and has an exiting texture. When in 3D paint mode, such as simply using the brush tool, when I cross the texture seam it creates a clear overlapping looking line. In addition, when I use the smear tool it won't smear across the seam so I can't blend the texture to clean-up the seams. I also noticed the brushes round cursor gets clipped when crossing over the seam.
Is this a limitation of R21, and if so, if I edit my textures using Cinema4D 2025-2026 does it have the same issue?
-
Hi context-employ,
If you are painting a certain area, a good idea for those cases is to stay in "Projection" mode for the time being. As long as not committed, the Blur Tool or the Smear Tool will work for all parts that are on the "projection Layere" since it was started or after the last time it was committed. In other words, paint on that virtual layer can be blurred or smeared, as it was not "translated" to the geometry/UV. I hope that this short intro makes sense; if not, please let me know. More in detail:
https://help.maxon.net/c4d/r21/us/index.html#11680
When you scroll down in this document, you will find the "Freeze 3D View". Which might or might not be on the menus. You can get it from the Main Menu> Windows> Customization> Commands: drag it into your GUI where it can be placed (close to other menu icons.
Save the layer or layers, open it in Photoshop, and work on it, save it in the Material> Reload. IF needed, switch off the Freeze 3D.I have done it today in R25 and 2025.3; I do not have an R21 version currently installed, sorry. But not much has changed except the interface organization.
I hope that helps to fix your seam problems.
All the best
-
Hi Dr. Sassi,
I originally tried the project mode, but the problem is the projection layer is transparent so tools like smear don't do anything because the original texture I'm trying to clean up is part of the material. I don't see anyway to make a selection of the original view of the material and copy and paste it to the projection layer so it has some pixels to modify. Does that make sense?Bruce.
-
Hi Bruce,
Yes, the Projection is always transparent, initially, except for the content painted on it.
If you have a texture, it should appear after using 'Freeze 3D View' and saving it as PSD. Then, after fixing, merge it. However, I do not have R21 here. There were some problems back then, but if that was with R21, I really don't know anymore (I have been using C4D for 28 years, so I don't have all the releases memorized.)
The PP (Projection Painting) needs to receive the new information from the "PP All layer" in the PSD, Merge Texture (C4D), and then it needs to be OK'd to be projected.Here is a short demo:
https://projectfiles.maxon.net/Cineversity_Forum_Support/2025_CLIPS_DRS/20250627_Freeze3DView_2025-3.mp4
Please test this on a copy, as I can't tell how R21 will do, assuming you have a current OS running.If it is not working, here are some suggestion, guesses…
For the seams, you can CMD-Click to select the color, then paint the seam newly, either on that layer or in Photoshop. Any change can be done.
Perhaps your project is different, but I have nothing here, nor R21.If the texture is in an 8-bit color, remapping it after setting the UVs differently can sometimes help. However, remapping is like lens distortion correction; it roughly cuts the quality in half.
https://help.maxon.net/c4d/r21/us/index.html#11664Another option, and again a guess, perhaps a Camera Projection might help. Render the object from the main view, Luminance channels to get no light into it, Protect the Camera (PSR), and have it as top material. If you have a bump or displacement, I would no longer recommend this approach. No idea if the Color management is game for the setup.
All the best
This post has been edited (video clip), as I continue to search. 12:30 am. Now I call it a day.
P.S.: There is a difference in Preferences> BodyPaint between R21 and 2025.3, please check this. …Include All.
-
Hi Dr. Sassi,
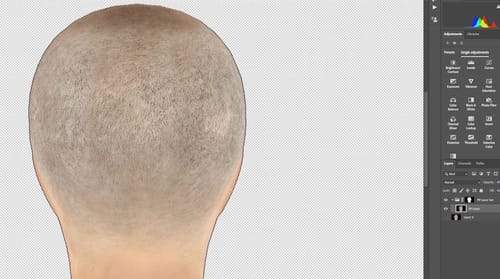
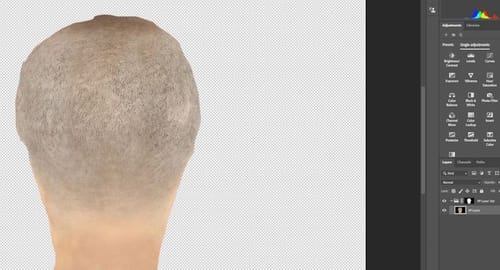
Thanks for the help and no need to reply. I just tied using Cinema4D 26 with the idea to use it just for the texture painting, but found Body Paint works exactly the same as in version R21. The object I'm trying to work on is a human torso and the UV map is unwrapped perfectly "flat" and the seams go down the middle of the back and the back of the human head. This mean the edges of seams on the 8K resolution texture files are on opposite sides when loaded in a image editing application such as Photoshop so there is no practical means to "blend" part if the image that is on the right side of the image to the left side, and even more complex around fingers and arms. For this kind of editing in Body Paint it seams the best mode to use would be 3D Paint mode, but my tests looks like the brushes don't use the UV map to know that the seam is simply two polygons of the same size are connected together.
I just noticed your edited comment about Body Paint Preferences, I will look at that and see what that's about.
Bruce.
-
Hi Bruce,
If I am not mistaken, you don't get the results from "Freeze 3D View," and that is related, as far as I can tell, if a single click is missing. Hence, I shared a video (a short Demo) above that points to the main critical steps.
If one step is missing, you get the texture instead, not the view. If another step is missing, the Frozen 3D view will not get back to the model.
Please read the post, not the email. I realized last night that I do these steps with muscle memory, and the manual does not have the full process to get a roundtrip established. Again, the 60-second video is a working round trip.
Cheers
-
Hi Dr. Sassi,
Thanks for spending the time putting the video together. Below is comments on performing the process to your video:-
On my Cinema4D 2025 the "Freeze 3D View" button is by default already shown.
-
The process works exactly the same on both Cinema4D 2025 and Cinema4D R21.
-
Both Cinema4D versions export a Photoshop file where the layer mask allows a single pixel black line the surrounds the entire edge that gets applied when "Merging" the file back in Body Paint. This
seams odd that I would have to manual edit the Photoshop file to get rid if this black boarder line. -
Your comment "There is a difference in Preferences> BodyPaint between R21 and 2025.3, please check this". I see no difference in the preference options between version 2025 and R21. In addition the Maxon online documentation for both versions doesn't even cover the Body Paint preferences for some reason even so it's shown on Preferences overview. So I don't know what is new in version 2025 that you are seeing.
Over all I can make this process work but I would like to know if there is a way to stop this black boarder being created as I will have to spend a lot of time making many "freeze" images to work around a torso seams.
Thanks again,
Bruce -
-
Hi Bruce,
Thanks for the reply,
Sorry, I can't reproduce the black artifact. Some wild guesses...Can you reduce the PSD file to the PP layer, drag it out of the Folder then delete the Folder with the mask?
Perhaps setting the Freezing 3D View to 2x of 4x (scale) might limit the effect.
Also, for the "PP All Layers", try to delete it before saving the PSD. Is that helping?
All the best
-
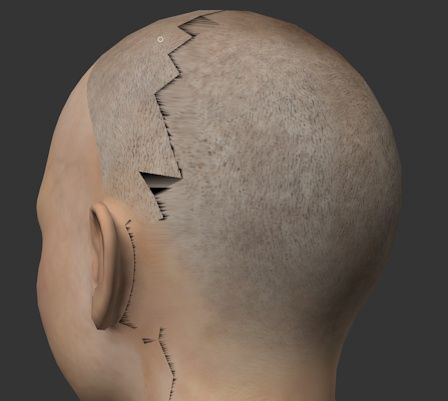
Hi Dr. Sassi,
Actually noting I try stops the black lines.
Attached are some screen captures. The first is what it looks like imported into Photoshop from Cinema4D 2025. See the black boarder?
Second screen capture is after I aggressively increased the mask layer in Photoshop.
Third screen capture shows even after doing all this black line is still there and I also noticed the texture around polygons edges are distorted (zoom in on the hair stubble on the edges).
I haven't been able to find much on the internet on using Body Paint for this kind of task and I'm starting to wonder if it's even used for this kind of task, plus Maxon hasn't made any changes to Body Paint that I can see from R17, which makes me think not many users are using the tool for this kind of task.
Before I suggest we drop this issue, is there a way I can edit the projection layer in Cinema4D as a flat image and erase the edges before applying it to the main texture?
Bruce.
-
Hi Bruce,
From the perspective where you can see the black artifacts, create a Freeze 3D View. The image in Photoshop should be limited to the problem area of the fix (e.g., Stamp Tool). Leave only the PP Layer in the file, while the layer hols strictly transparency and only in the area of the problem content.
Save it, merge it apply it. The black seam might come from the Black background that the "PP All Layer" had, which should not be part of the Merge file.
Is that working for you?
Cheers
-
P.S.: here is a Freeze 3D View Workflow - but as patch.
I have removed the save and load parts, as I think they are clear.
60 seconds
https://projectfiles.maxon.net/Cineversity_Forum_Support/2025_CLIPS_DRS/20250627_Freeze3DView_patch.mp4My best wishes for your project