How do I repeat a ramp pattern on an object using the texture node?
-
Hi,
How do I map a ramp on an object with a repeated V in Redshift, so it will show the ramp more than once on the object and is it possible the animate it going ramp going up repeatedly? Thank you in advance.

-
Hi Hoi,
There are several ways to get there.
• The simplest is to right-mouse click (on the gradient) and choose Double Knots, fast and easy. But hard to adjust.
• The next one is to do it via UVs, perhaps not as simple as it might sound.
• The best way, in terms of adjustment, is to drive this with a linear ramp (knot set to linear interpolation), then do some math, such as multiply and modulo.
If you want to change the "Mode" (e.g., circular) you need to use the first Ramp, the Driver in this case, not the color one.
My best wishes
-
What an interesting way to adjust the ramp with math node, I'll make the ramp in Photoshop and animate it in the texture node using offset V. Always appreciate your insight and help!
")
-
You're very welcome, Hoi!
To animate, just use the Add Node and animate the value 0-1. In the F-Curve Editor Timeline, set the keyframes to linear, and perhaps the Function>Track After> Repeat After
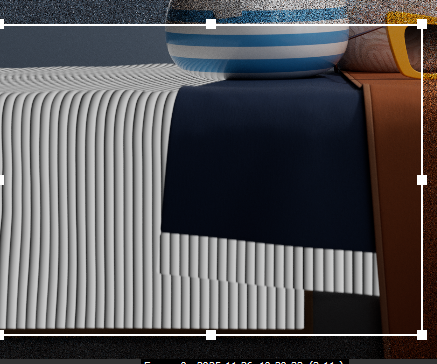
Example (render it)
CV4_2025_drs_25_RSrr_02.c4dSince I write in a forum: If you need some background about this setup, please let me know.
Cheers
-
This is amazing, it would be great to get some technical and math background about the setup when you have some time. Thank you!
-
Hi Hoi,
Here is a simpler example (less nodes), just using the first Ramp, but it explains very well the idea:
https://www.youtube.com/watch?v=c5uhSkEiPRc
This will help to go faster through the text below.Think of the Gray value-based Ramp as numbers, All between zero and one.
When a certain "pixel" needs to be rendered (simplified said), the value from the Ramp will be requested; let's say it is 0.3 Somewhere in the middle, dependent on the interpolation.
This value would then go into the second Ramp and use the Color that the gradient has at position 0.5
Now we have used a multiplication after the first RRamp, so the example would be 0.5 times 20 (the number in the multiplication node, which can be set to anything you like) = 10
The second Ramp would receive now 10, and that is outside of the gradient from 0-1.
The next Node is now the critical one, ModuloModulo. Which is just a divider (like 10 divided by 4 equals 2.5), but it doesn't care about the numbers left from the period (2); it cares only about the value on the right side (.5)
This is a value that the second Ramp can use for the gradient.When we take the first gradient, it has a lot of values between 0-1, but that results only in one gradient from black to white. One time.
Multiplying this by 20 means it provides values between 0 and 20 as a list of increasing numbers.Which the Modulo, we use the ModuloModulo to divide it and get only the right side each time, which creates many short grades between the 0-20 value, but never exceeds the 2.5
I used the divided by 4 to make a point, as dividing by one might be received as "abstract". But let's use the 20 divided by 1 and explore this.
We need the second Ramp/Gradient to a maximum value of 1.0, so we divide this by one and always receive the remainder, never exceeding 1.0
This means we get 20 black-to-white gradients, and that is each time translated into the color gradient of the second one.
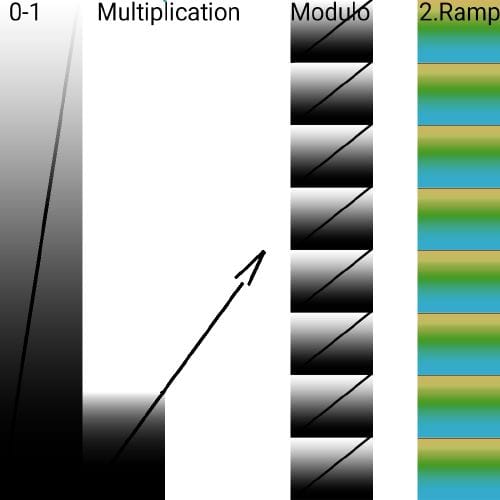
Now I, the new Node, was an Add node (plus), which moved just the values up, and while animated, the whole gradient in this Node expression moved.
I hope that helps a little bit, let me know if I missed a point, or where it stopped for you to create clarity.
Cheers
-
wow, thanks for the great explanation and video reference! this definitely is a better method than jumping between apps to modify the ramp
-
Thank you for the feedback, Hoi.
Doing it in the node editor is nicer than moving in and out of the app.
I'm sure after you have this as a muscle memory, you will expand this.
I'm glad it was useful.
Enjoy
-
This is good, but I do find that this method doesn't produce a consistent pattern - in my case the repeated gradients in the middle are smaller then the ones on the ege of the texture.
-
Ah, need to set the gradient interpolation to Linear of course!
-
Thanks for updating your own question, atomician.
Yes, for this we need linear values. Well spotted.
Enjoy
-
i try this method with splines and work pretty well! thanks
-
Thank you for you feedback, tear-one.
Enjoy your project
-
Hello, following this, it works, but it shows a universal projection even if I use object mode in UV projection. Any way to solve this so that all objects project according to their rotation?
-
Hi bench-support,
Please have a look here.
CV4_2026_drs_25_RSrm_01.c4dI rotated some of the UV polygons, and it is safer (additionally) to drag the UV Tag into the material (or write the exact name into it, to always ensure you have the correct one.

Is this working for you?My best wishes for your project
-
@Dr-Sassi Thanks for the reply. My particular case is using a material for various objects with user data node but combined with this repeated ramp bump map.. So what could be more effective than using just manually rotating UV map?
https://1drv.ms/u/c/cd71275177a2d3eb/IQAf6AjLHRbkR62wJvb5O0UUAUDhr_FHNGYOi1Q4lutPBoE?e=mNnNOY
-
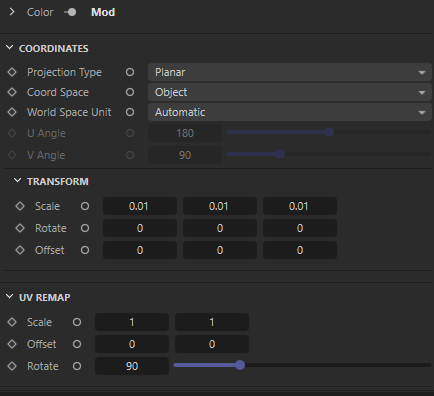
Hi bench-sport,
The UV-Map has a transform option (three values) and a rotation (single value), but there is no tiling for this Ramp effect. Which means the only way to cover the area is by scaling and offsetting. Which might be quite cumbersome, as the rotation and the scale are not uniformly during a rotation.
https://help.maxon.net/c4d/2026/en-us/Default.htm#html/COM_REDSHIFT3D_REDSHIFT4C4D_NODES_CORE_UVPROJECTION-NET_MAXON_NODE_BASE_GROUP_INPUTS.html?TocPath=The%2520Node%2520Editor%257CRedshift%2520Nodes%257CRedshift%2520Utility%2520Nodes%257CUV%2520Projection%257C_____3
Below are two examples, differentiated only where the scale and offset take place (UV Transform node)
CV4_2026_drs_25_RSrr_11.c4d
CV4_2026_drs_25_RSrr_12.c4d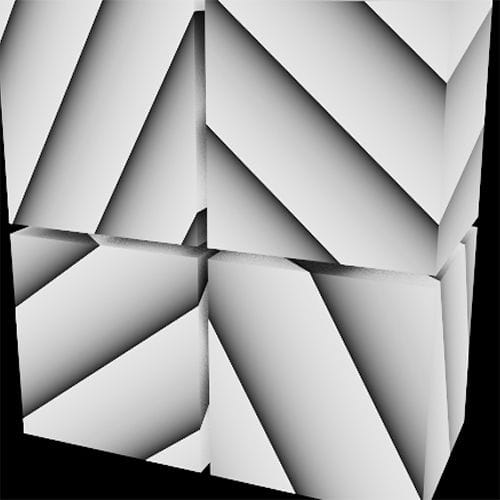
The User Data was copied from the Node (Right Mouse Click, Copy UI),
Then pasted into the User Data (Click on the top entry UserData Default, to enable pasting)For any file sharing, Wetransfer, DropBox, Google, Apple or Adobe Cloudservices. Data uncompressed during upload, URLs pasted fully and plainly.
All the best
-
@Dr-Sassi Thanks for the examples!
-
You're very welcome, bench-sport!
If there is any question, please let me know. Note: Nov 28th is a (US) Holiday here and I will be off-line.
My best wishes for your project
-
Hi bench-sport,
There is some improvement in this, with the 2026.2 UV Context Projection.
Example
CV4_2026_drs_25_RStr_01.c4dAs before, the ramp produces only a Square; when rotated, this shows the borders, hence the settings in the Node for this use.
More about this:
https://youtube.com/live/ZAom6DvSi3s00:49:16 UV Context Projection - UV Transform
All the best