How to get particles to travel along the surface of a moving object
-
Hey there, using "stick" modifier I've figured out how to get particles emitted from a mesh emitter to stick to a moving surface. What I can't figure out is how to apply field forces to them and have them swirl around on the surface of a animated object.
thanks!
-
Hi signature-view,
Would that be supportive for your target? I fear not, as it is all static. Scene files are included; see the text field below the video
https://www.youtube.com/live/QaDFSdG2BFI?feature=shared&t=2787Please let me know how it goes. I have not gotten any Swirl translated to a Tracer while positions are taken from a moving object.
If I find anything, I will share.
If I had more data, I could explore it more in detail. No project file is typically the starting point for a back-and-forth discussion.
If it is below 1MB, it can be attached as a C4D file. Otherwise, I use only Dropbox, WeTransfer, Google, Adobe, or Apple cloud services; no zip, rar, etc. Please paste the URL into the text without an HTML wrapper. Thank you very much.Cheers
-
@Dr-Sassi particle_on_moving_geo_v01.c4d
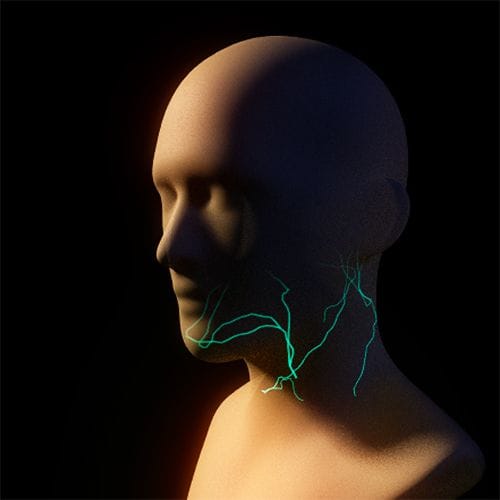
Hey Dr Sassi, I've attached a simple file so you can get an idea of what I'm trying to achieve. The eventual idea is that I'll have match move of an actors face who's moving through a scene. I'll be tasked with growing a vein-like structure under the skin. I was thinking of tracing particles that move along the surface of deforming geo.
In the example I've provided I just added a random field to a sphere instead of using the face match move. Let me know if this makes sense.
Thanks!
Patrick
-
Hi Partrick,
Thanks for the file and the target use.
The easiest would be a to use the Skin Shader (Use the "red" layer perhaps) and develop a specific texture for it.
.
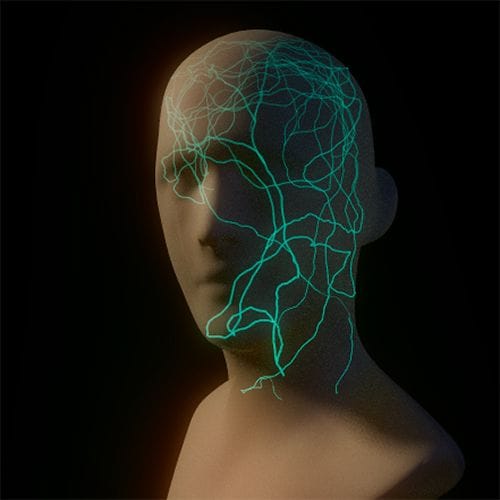
Here is my favorite so far.
Particles would move along the skin, and any change in the head position would not change the past position of a particle. In this way, the Tracer will create splines that move away from or even above the skin.My suggestion is to use the Ivy Generator (Asset Browser) and remove any leaves while growing it inside the head to achieve a complete network of veins.
These veins are then Weighted (Bind) with the Joints that matches the move the actor. If not tracked, perhaps a Rokoko Suit might help, which can be worn under clothes.
Another option is to book from Erica Hornung: The Art and Technique of Matchmoving: Solutions for the VFX Artist (2010)When the body double matches, the Vertex map gets to work. Here, the Sphere Field drives the Visibility.
Example:
https://projectfiles.maxon.net/Cineversity_Forum_Support/2025_PROJECTS_DRS/20261001_CV4_2026_drs_25_ANvg_02.c4d.zip
Images are exaggerated to demo the effect.
.
As a side note:
I also explored painting the veins as a spline, using the Wrap Deformer to create a Sphere out of the splines, with the MoSpline as a growth option, and then projecting the splines to the head. I do not attach it here, as the version above shows better results, but for the sake of brainstorming, I wanted to mention it.Let me know if you have any questions.
Cheers
-
Amazing! Thank you. This method looks very promising. Although I don't yet have a Maxon One membership so I'll need to upgrade. Before I do, can you tell me how easy it might be to art direct the growing branches on the face? For example, I will need them to originate from the temple and more towards the centre of the face. I see there's a target mode where they can grow towards something.
-
Hi signature-view,
There is a parameter called Surface Force: explore it.
Take the Head object from the Asset Browser, or copy the one in the files.
Set the Snapping to Polygons, Switch off Points, etc.
Then use the "Sketch" Spline tool and start creating the Veins you would like to see on the face.
When done, copy the Spline and use it as the "Rail" in the Sweep with a profile. Nothing will show. Switch off the Rail Direction in the Sweep, also no improvement, correct?
Now, place the Plain Effector under the Rail Spline as a child. Set it to deformer and point mode. It might already explode. Set the Position X and Z to a small value until it looks OK.Place a Sphere Field close to it and apply the Sphere Field to the Plain Effector. Now you can define the diameter of the Vein (Sweep), and it can grow as you like. Explore other Fields if you like.
Files …ANfv_01.c4d and …ANfv_02.c4d (Render to see the effect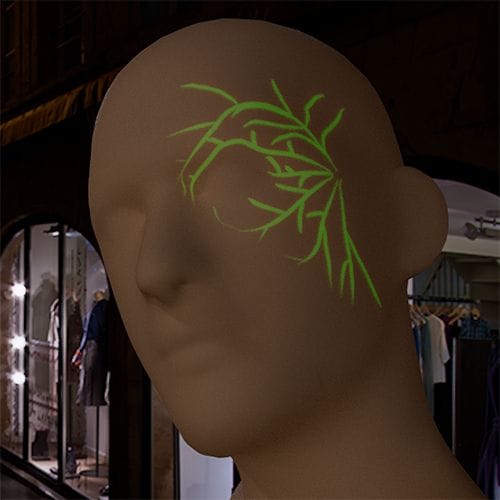
This has one problem: one side effect. If you need to deform it, the Spline will not be deformed, perhaps for the Field, but it will still be visible in the image.
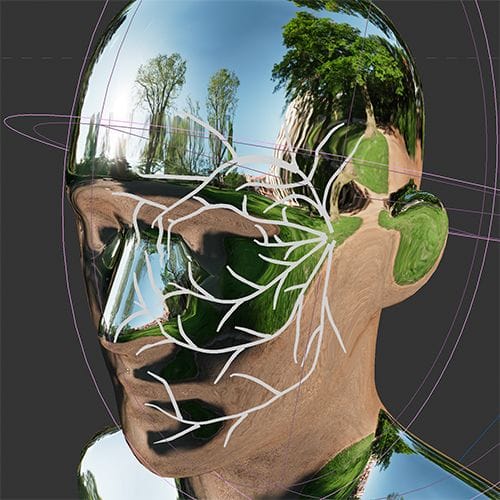
Time to bake the growing Vein into a texture. Prepare the UV space accordingly, so the textures do not need to be larger than necessary for the required area.
The simplest approach is to switch to Standard Render, apply a 100% reflective material with no roughness.
The veins are made of a white, illuminated material. Anything else is off in the scene.
Bake Texture, set to Reflection, can now render the animation. Set the frame rate; otherwise, you might only get a few images.
File …ANbk_03
These image sequences can now be used in RS or any render. Since it is UV-based, any deformation can be done.
File …ANbt_04With those steps, you have a lot of control, of course, baked is baked, but the color and even animated noise can be applied.
I hope this will give some ideas for the project. Please let me know if you have any questions.
All files: https://projectfiles.maxon.net/Cineversity_Forum_Support/2025_PROJECTS_DRS/20261003_CV4_2026_drs_25_RSbt_01.zip
Enjoy your weekend