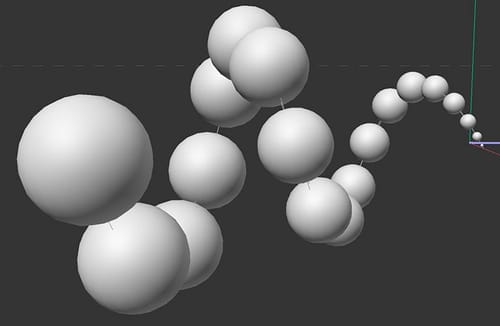
Distribution of Clones Along Spline as Clones are Scaled Down
-
I want to clone an object along a spline and have it scale down along the spline. I use a step effector and can get the scaling looking ok but the spacing of the clones remains the same. Thus, the smaller the clones the more space between them.
I would like to have the clones adjust their position so that their surfaces remain the same distance apart.
Here's a link to an example scene,
https://www.icloud.com/iclouddrive/05944t1vHraIcrO2xsF8pkcpQ#DistributionOfClonesAlongSplineForCV
Thanks,
Greg -
Hi Greg,
There is no native solution for that. I wish it would exist.
Let us assume you know the difficulties and that I write in a forum, addressing all levels of experience, then let me say that:
The problem is that the scale of the one before and after has to be acknowledged to determine the position, and if one changes something, all parts will change, more or less.If we go with a fixed scale, then we have fixed data, but like in your example, the Helix is not the distance going from one point to the next, as the direct distance is the key, not the segment of the Helix.
I assume I have lost a few readers already. But that would otherwise be a long text.So, how to get it done anyway? My fixed belief is, as before, that I work with an application that is render oriented, not a game engine. If so, we can fake it, as the result is visual and not a result (number). But yes, a one-button push function would be nicer. Push Apart with clone size as distance...
So, with this explanation, I hope my little setups make sense, and if the imprecision is OK with you, perhaps one or the other might work already.
The first one sets up a spline, with points at a progressively increasing distance. That is where the Object will sit. With this, I can then use the distance to the next (or previous) and determine a scale factor, which is normalized, with the last distance. So I get values between >0 to <1. These values can be placed into a MoGraph Weight, which is then used in a Plain Effector to scale the objects. Is that precise? Well, no.
https://www.dropbox.com/s/7i6oi67ipzum6da/CV4_2023_drs_MGsd_01.c4d.zip?dl=0The next one uses the option to blend between Mograph Cloner -Child Objets, which can be Cloner with one Clone. Then the Parent Cloner Blends among all of them. This can be done with the Plain Effector>Modify Clones.
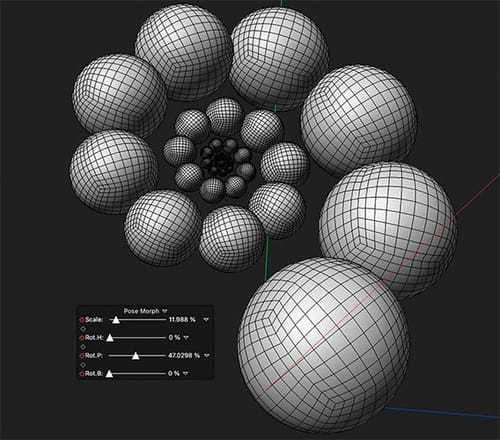
The position of the Spline can be set with the Spline Effector. In that way, all five instances have a progression. 0, 24, 48, 72, 96. So why not 100 on end? Because the last one is here, the big sphere, and if 100 would be used, the big sphere would cover the small ones if a circle is used.
With this, I can dial in how many spheres (clones) are used and adjust each sphere object accordingly. Since they are all blended, this is a multiple-step action. Because the first we might get perfect, then with the next increase or decrease the previous one. This sound perhaps abstract, but turns very practical if done in the setup.
https://www.dropbox.com/s/9ymik3zogx1li9k/CV4_2023_drs_MGsd_11.c4d.zip?dl=0So, Ideally, this would be set up via Python and store the values there, which can be done in many ways. But we have the Developer Café, which would be the place to go.
Besides, I wish more people would make that a feature request here "Share Your Idea".
https://www.maxon.net/en/support-centerMy best wishes

-
These are not Clones, but perhaps an option to get there.
https://www.dropbox.com/s/rn60cf0wli0xmsj/CV4_2023_drs_ANps_01.c4d.zip?dl=0

-
@Dr-Sassi
Thanks. I found yet another way, with scene nodes. Pretty simple, not clones but I think the simplest of all. For the small scene I am building not being clones isn't a problem. Your example using the pose morph tag seems to have even better artistic control than the one I did with scene nodes but I'm not at all familiar with scene nodes.BTW, do you know of any good tutorials on using scene nodes? Specifically, the distribution nodes?

-
Thank you, Greg.
You might have a look here:
https://www.cineversity.com/vidplaylist/scene_nodes_-technology_preview/scene_nodes-_technology_preview_distibutions_cloning_with_nodesThe main idea is that these are more building blocks for content developers, so they are not promoted much. It is assumed that a particular background is already available from developing content with code. This is my impression.
They are powerful, but more to build "tools" or capsules than they are useful for a single project. But of course, whatever works is preferable.
The idea of MoGraph sits somewhere between individual animation and particles. But sometimes, a mixture of anything available might help. I believe that real magic starts when things are combined. If that is the target, then the information flow is crucial besides technical creativity. (E.g., Priorities.)
For the C4D-core forum, Hrvoje Srdelic made a more extended series. https://www.core4d.com, you might contact the admin if they sell this three-part series anymore. It was done excellently. But yes, Hrvoje is a colleague of mine, so I'm 100% biased

My best wishes
-
@Dr-Sassi Could you let us know how you created the poses for the Pose Morph tag? I am trying to recreate this mechanism but cannot figure out how to, for example, scale each sphere individually and with different strengths while also changing the position of each sphere to be tight to the previous and next spheres. Same issue for creating the rotations.
Did you, perhaps, use a set of joints and IK or IK Spline ? Then delete the joints and IK goals? Or something else?
[Edit]: I need to do this as the radius of the sphere is too large for the scene I am creating.
Thanks so much,
Greg -
Thanks for asking, Greg.
Anytime. Please have a look here:
https://www.dropbox.com/s/m7jgj6h9iy7zpl5/Rigging_a_hierarchy_Pose-Morph.mp4?dl=0I assume downloading this mp4 is a good idea to see it in better quality. (no audio).
I have set the sphere to a low segment amount to point out more where the rotation is, with full spheres that are not so visible.
Just think of it as simple steps. No IK, no secret. It is mainly the power to have many objects selected simultaneously and adjust them simultaneously. At the same time, the hierarchy inherits the scale, for example, to our advantage. I use the Select Children here. There is a Selection Object, but I have run in the past into some problems (while Pose Moprh is involved), so I stick most of the time with Select Children.
All the best
-
@Dr-Sassi Thanks so much!
My problem was that I was trying to do the scaling with the gizmo and not through the coordinate manager. Even seeing you do it it still took me a while to understand why each sphere was smaller than the previous. It's obvious once one sees it... If I just selected the top-level sphere and reduced its scale to 0.9 then all the others would reduce by virtue of the parent-child relationships. Selecting all and setting all their scales to 0.9 results in a cumulative effect.
Thanks!
Greg -
Yes, Greg, exactly.
Once you have done it, it is relatively simple, considering its effect.
Thanks for your feedback. I love the little 60-second clips. They are like drawing to me; one must "see" to guide the hand. When it hits the "canvas", you own it.

Enjoy