@noseman Thanks Mr Noseman, very much appreciated 
Kind Regards
David
@noseman Thanks Mr Noseman, very much appreciated
Kind Regards
David
@noseman Hi Mr Noseman, thanks for this. I've added a link to a simple cylinder that is intended to look like a rod that has been turned on a CNC machine. Apologies if my material is not very good but I just experimented until it looked good enough for images of our products. I tried to imitate the cutter marks in the steel as it is turned. This is one example of a material I need to be able to export for things such as gITF.
https://drive.google.com/file/d/1F52SLKFDLmxybAb6hqrXSenuPFuHk5al/view?usp=share_link
Kind Regards
David
@entry-newspaper Hi, thanks for the info, this is where I'm really struggling, I don't know what to do to make my materials compatible. I am aware that the Cinema 4D procedural materials that I've made will not export out into a compatible format but this is exactly what I'm asking about. (I'm still at the beginner stage when it comes to Cinema so I may even be using all the wrong terminology) I was under the impression, (although I may have got this completely wrong) that I'd need to do something called baking to turn my materials into bitmap images that could then be used in something such gITF?
@entry-newspaper Hi, thanks for the info. I don't really have time to start learning Blender at the moment unfortunately. The first thing I need to understand is how to make my materials into images (I think?). In the tutorial above the materials use bitmap textures but as I explained in my post mine are all procedural. It's very frustrating as the model side of things works great, the geometry is perfect. I just need to learn how to get the materials to work too
Hello,
I have a lot of old models of products that we would like to put on our website so that customers can look all around them in 3D rather than just flat images.
I've played about with some online viewers and getting the models in is easy enough but I don't know how to get the materials in. All these models were done in the standard renderer and most of them use procedural materials. Each model typically uses between three and five materials. I've heard something about 'Baking Materials', is that what I need to do? If so how do I go about doing it?
Many Thanks
David
Oh no! I will certainly miss you Dr Sassi, you have helped me so much and got me out of some sticky situations with your invaluable advice. I wish you the best and really hope you will return someday.
Very best wishes, David
Hi Dr Sassi,
Thanks again, I used your suggestion for stopping them where I liked where they fell and froze them and got my project done
Howvere I noticed something strange on one occasion (I did the same thing with a few different scenes) On one of them, I cached it and stopped on a frame where I liked it, but I forgot to do current state to object. When I rendered out the current frame, it was a different one to the frame I stopped at in the timeline. Why would that be? It's not a problem since I got my project done but I'm curious, so I understand whats happening.
Kind Regards
Dave
Hi Dr Sassi,
Thanks so much, that worked  Are you supposed to set the hierarchy level according to how many objects you have that you want to act as one? Initially my object broke up. It's made of three objects so I set that level to three and it worked.
Just one more question if I may? This is actually for a still scene, I just want some objects to fall to the floor and stay still where they land. I set the friction, bounciness and stickiness to zero but they still slide around the floor after they have landed. What else do I need to set to make them drop and stay still where they land? Many thanks.
Kind Regards
Dave
Hello,
Has the Rigid Body tag been changed in the latest release?
I have an object (which is a collection of a few objects grouped into a null) and I need it to fall to the ground. However it isn't working. I have done this before with the same kind of object and I think I had to change to 'Moving Mesh' but I don't see it anymore?
Kind Regards
Dave
Hi Dr Sassi,
Just to say, I got my project completed on time and it turned out just as I had imagined it. (and the boss loved it!) I wouldn't have achieved it without your superb advice so a big thankyou to you Dr Sassi 
Kind Regards
Dave
Oh wow that is such a fantastic explanation! Thanks ever so much Dr Sassi, I'll let you know how my project goes
Kind Regards
Dave
Hello,
How can I use the Voronoi fracture to break an object into two equal halves? I've used it many time before but in the past I've always been happy with the random breaking and multiple pieces. This time though, I only want two halves with the object being split horizontally. I've tried reducing the points to give me only two pieces but I cant make it so that the break is along the horizontal axis. I also want have random jagged edges of the break.
Kind Regards
Dave
@ericsiegel Hi, thanks that's very helpful. Yes in my case the end result is only for making product imagery and videos of those products. I don't need to collaborate in any way with other companies on the 3D side of things, it's purely all about making them look as good as they can for promotional purposes. I think I should experiment doing them much larger and see if it makes things easier, thanks.
Kind Regards
David
Hello,
What's the best advice for the size and scale of models? I've seen it said in some tutorials that its better to model at real life scale, however I've seen some where people have modelled at a much larger scale than reality.
In my case, many of the products I need to model are very small in reality and I've always modelled at life size to try and maintain as much accuracy as I can, but sometimes I feel its very difficult to get the lighting to look good at such small sizes, and sometimes the materials too. So is modelling small objects at a larger scale recommended or is it better to keep everything at real life scale?
Kind Regards
David
Hi Dr Sassi,
Just to say I got my project done using the technique you showed me, thanks again its very much appreciated
Hi Dr Sassi,
Oh dear it seems I didn't notice the selection  That's why it looked different on my model, I'm such an idiot
Once again thanks so much for your advice, I was pulling my hair out on this one.
Kind Regards
David
Hi Dr Sassi,
Wow that's amazing! It's pretty much the result I'm after. I just need to make a few alterations to mine to get it to look the same. On your model in the example, that's practically there what I need, but when I put those materials on my model, the bright green colour is too strong and doesn't look as transparent as it needs to be on the flat surfaces. Is it possible to turn down the effect of the bright one, rather than turning it off?
I haven't encountered these RS Open PBR and Ray-Switch nodes yet, I will need to read up on these and do some study on them Thanks very much for your advice 
Kind Regards
David
Hi Dr Sassi,
Thanks for the advice I didn't know about Bloom, that could be very useful in future.
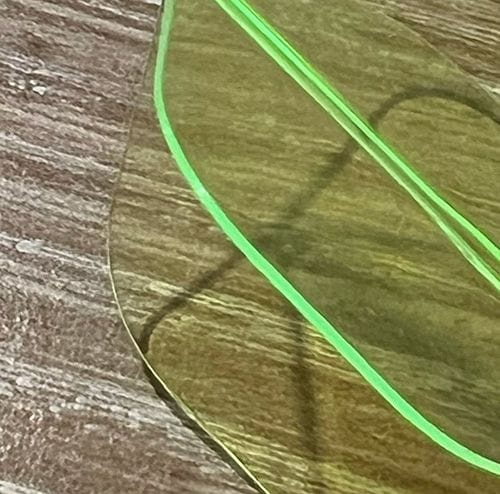
I've still not managed to nail the material yet. I've almost got there but not 100% The plastic I'm trying to emulate is transparent with a slight colour. On the large flat surfaces the colour is very weak, but at the edges the colour is much stronger, almost as if the light is bouncing around inside and exiting out of the edges and concentrating the colour. It does this in ambient room light but it really looks like it's illuminated from within, almost like it's radioactive!
The attached image is a sample of it that I took on my table in just normal room light.
I tried using Transmission and set the absorption colour and distance according to the manual, and it almost gets me there but, on mine the edges are dark and not bright like the real thing. I tried putting a bit of luminance in but it makes the whole thing look illuminated (not just the edges) and adding glow just creates a glow around the outside of the object. I'm not sure where to go from here?
Kind Regards
David
Hi Dr Sassi,
Thanks for these, that certainly gives me some more avenues to explore. I didn't know about the mesh checker so I had a look. I didn't understand a lot of what it was reporting, and how I could go about fixing it. It did report that there were lots of bad polygons, but unfortunately I couldn't see how I could correct them, the mesh from the conversion looks quite messy. For now I've got by with retouching the blemishes on the still shots in Photoshop, although this will be a problem when I need to animate them. My best solution will be to remodel them from scratch in Cinema, if I can just get the time to do it
Kind Regards
David
Hello,
How can I replicate coloured translucent plastic that appears to glow at the edges? We have this plastic material that almost looks as if it's being illuminated from within and the edges appear to glow, even though it is only the ambient room lighting illuminating it. I'm doing this in the standard/physical renderer and I've tried playing with transparency and the absorption colour. It almost gets me there but it doesn't quite achieve the glow effect at the edges. Any tips or advice would be much appreciated thanks.
Kind Regards
Dave